Mustang
Sunday, November 7, 2010
Engine Rebuild Begins
We have been debating for months on what to do with our 289 engine we bought from a craigslist seller. We were not even sure the engine was even worth rebuilding. We had been advised to just buy a crate motor. The engine we have was a 1966 A code 4bl carb. We opened it up with the help of a friend from the coffee shop (Ed). He is a retired GM mechanic with many years of engine experience behind him. When we pulled it apart we were surprised to find that the engine was very clean a probably recently rebuilt. We are sending it off to the machine shop to be cleaned up and possibly re-bored. We should be able to save most of the parts. Updates to follow.
Thursday, October 21, 2010
Off to the body shop
We said good bye to the stang today. It was flat bedded to our friend Don's body shop in Westport, MA. We finished as much as we could and now it was time for the pros to finish the final body work and paint. It will be painted black with gold gt stripes. The guys at the shop will be removing the engine and the 6cyl will be replaced with a 289 V8 engine and C4 tranny, with an 8inch rear end. We will keep the progress posted as we go along.
Sunday, October 17, 2010
Rear door window refurbishing
We decided to refurbished the rear windows. The replacement parts were very inexpensive and it appeared to be an easy job. Thank god Gramp was around that week as we were not having much luck getting the windows out. Once Gramp figured it out it went pretty quickly. We POR 15 as much as we could and put the new rollers on the tracks and it now works as good as new. Thanks Gramp we really appreciated the help.
Quater Panel replacement
Cowl repair is complete
It was a long hard road to repair the cowl, yet it is done. The cowl is the mustang's biggest problem and the first repair that needs to be done. We started the repair then were sidetracked by the floors. We had to wait for a heater box to come in from the parts supplier. We needed the box to line up the induction hole. The cowl was POR 15 and then sprayed black before the top piece was welded in place. There was lots of patches and grinding but we saved 400 on parts by restoring what we could.
Tuesday, August 3, 2010
Sub-frame conectors and Torque box repair
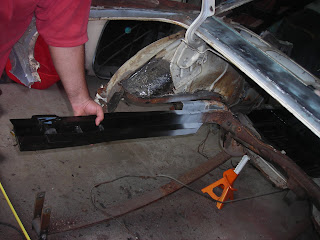
The sub-frame connectors arrived from Laurel mountain mustang, we went with them because they were the only supplier with a heater box in stock. We also got the rear quarter-panels and tail panel as well. After patching the torque box area and the frame where the leaf spring attaches we were ready to weld in the sub frame connectors. It really went fairly smoothly, once we got the shackles from the leaf springs to finally come off( lots of grinding and banging). Welding has become somewhat enjoyable for us. We have mastered the basics and nothing has come up that's been too difficult.
Monday, July 19, 2010
Trunk Pan Fits Like a glove
We were skeptical. Will it fit?? Well it did fit. We did have to remove the drivers side wheel wells to be able to slide the pan into place. Once they were cut out, the pan slid into place. We smiled from ear to ear, finally something went according to plan. We drilled out holes so we could spot weld the pan into place. Once we welded the pan down we attached the floor to the trunk. Then we cut out the remaining rust that was left on the floor and fitted a couple of patches. We are not quite finished but we are close to a final grind and then POR 15.
Trunk Comes Out
We thought that the trunk restore was going to be a piece of cake. It couldn't be worse than the cowl or the floors, could it?? It was downright nasty. Every spot weld was a real pain to drill out, and there must have been well over 100 spot welds in very tight spaces that needed to be broken out. We finally took the sawzall and the hammer and the metal shears and what ever we could to remove small pieces of the trunk until finally the last piece came out. Next we measured the rear frame rails so we would have the exact measurements when we put the replacement rails in. Once we had the measurements the rails were cut with the sawzall then everything was ground down and then finally treated with POR 15. We then fit the new rails into place measured and the clamped the rails into place. After one final check for correct length and height, we welded them into place. We gound all the welds down flush, then re-primed the rails. Next up, dry fitting the full trunk pan.
Subscribe to:
Posts (Atom)